Creating a Project from Scratch

The CREATE FROM SCRATCH option allows
you to begin working with your project immediately.
If the New Project Options window is
not open, choose File > New
Project from the menu and click on the CREATE FROM
SCRATCH button.
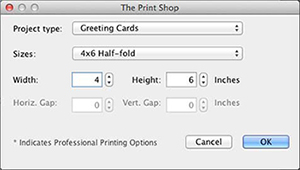
- In the New Project dialog:

- Choose an option from the Project type drop-down menu. This
will populate the Size list with the most common sizes for the
chosen type.
- Choose a size from the Sizes drop-down menu or click on Custom
to set your own size. Sizes that have a 2021 next to them can be
uploaded to a website for professional printing.
- To define a custom size, click on the arrows next to the
numbers in the Width and Height boxes or type a number directly
into the boxes.
- Some project types allow printing many similar or identical
items on a page (like business cards or mailing labels). If the
project type supports it, the Horiz. Gap and Vert. Gap settings
determine the amount of space that will be placed between these
items when printing. Click on the arrows or type a number in the
Horiz. Gap box to set the horizontal (side to side) space between
items. Click on the arrows or type a number in the Vert. Gap box to
set the vertical space between items.
- When finished, click OK.
- The Print Shop will now display the project. See the following
topics for information on typical starting points:
Adding
Photos
Adding a
Page