Adding Photos

There are three methods for adding a
photo to a page:
Photo Box Method - Use this method to
replace a dark gray photo template box on a project page.
Direct Method - Use this method to add
a photo directly to a page, whether the page has photo boxes or
not.
FastFill - Use this method to
automatically fill empty photo boxes in your project with a group
of photos of your choice.
Photo File Formats and
Recommendations
The Print Shop accepts most standard
photo file formats (.jpg, .gif, .png, .bmp, and .tif). You can also
add PSD (Photoshop) files to your projects. Please note that the
layers in a PSD will be flattened.
Recommended settings:
| File Format: |
JPEG (.jpg) |
| Quality: |
Medium to high |
| Size: |
1600 by 1200 pixels or larger recommended |
Note 1: To preserve transparency in
image files, save the file in PNG format from your image
editor.
Note 2: The Print Shop ignores
embedded color profiles; photos with color profiles may not appear
as expected in The Print Shop. Please save a copy without the color
profile for use in The Print Shop.
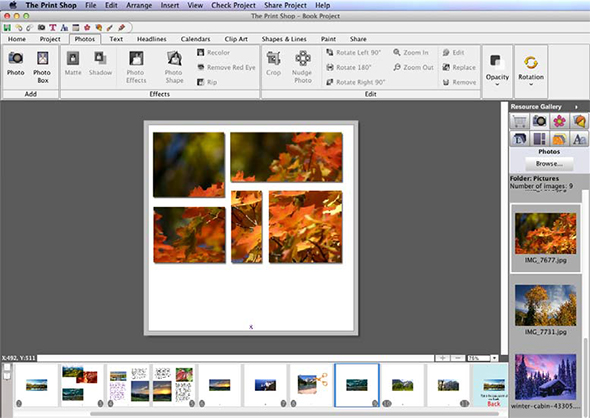
Photo Box Method
To replace the dark gray photo box on
a page with a photo:
- Double-click on the photo box.
- In the Add Photo window, use the top of the window to browse to
the folder with your photos, either by double-clicking the names of
folders to open them, or by clicking on the drop-down menu near the
top of the window.
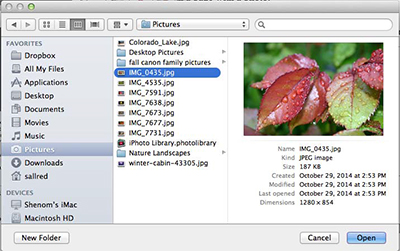
- To select a photo, double-click the thumbnail of the photo on
the right side of the window, or click on it once and then click
the OK button.
- The photo will appear in the Photo Editor.
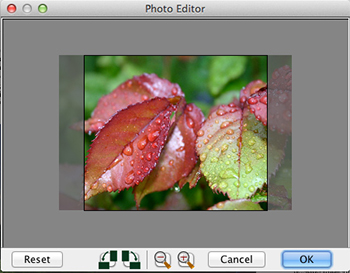
Any parts of the photo that are grayed-out will not appear on the
page.
- The Reset button will undo any changes you
make in the editor.
- The next set of buttons will rotate the photo 90º
counter-clockwise (left button) or clockwise (right button).
- The magnifying glass icons will adjust the cropping of the
photo to include more (left button) or less (right button) of the
photo.
- To change which parts of the photo will be displayed, click on
the photo and hold the mouse button down while dragging the mouse
around.
- Click OK to place the photo.
- The photo replaces the photo box on the page.
- To move the photo, click on it and hold the mouse button down
while dragging the photo to its new location. To resize the photo,
drag one of the light gray handles (small boxes) that appears at
the edge of the photo. Corner handles resize the photo
proportionally, while side handles stretch out a single edge.
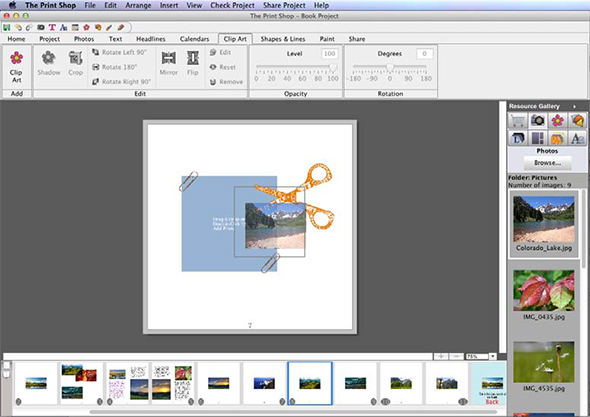
Direct Method
To add a photo or graphic to a blank
page or to add extra photos to a template page:
- Click on the Add Photo icon
 or choose Insert >
Add Photo from the menu. Alternately, drag and
drop photos from the Resource Gallery. See the Resource
Gallery topic for more information.
or choose Insert >
Add Photo from the menu. Alternately, drag and
drop photos from the Resource Gallery. See the Resource
Gallery topic for more information.
- In the Add Photos window, use the top of the window to browse
to the folder with your photos, either by double-clicking the names
of folders to open them, or by clicking on the drop-down menu near
the top of the window.
- To choose a photo, double-click the thumbnail of the photo on
the right side of the window, or click on it once and then click
the OK button.
- The photo or graphic will appear in the middle of the page. To
resize it, drag one of the light gray handles (small boxes) at the
edge of the photo. Corner handles resize the photo proportionally,
while side handles stretch out a single edge.
- To move the photo, click in the middle of the photo and hold
the mouse button down as you drag the photo to a new location.
FastFill Method
The FastFill option will fill empty
photo boxes in your project with a set of photos of your
choice.
FastFill is available from the Insert
menu (Insert > FastFill
Photos) and as an option in the Add Other Template Pages
function (Insert > Add Other Template
Pages menu item).
Choosing Photos
To begin the FastFill
process, choose the photos to add to project photo boxes in the Add
Photos window.
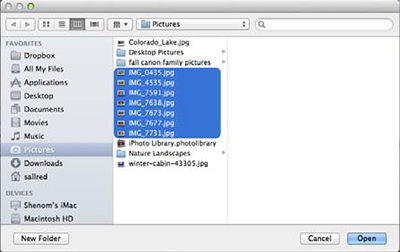
- Choose the folder with your photos using the top of the Add
Photos window or from the drop-down menu at the top.
- Click on the thumbnails of your photos on the right side of the
window to select them (you may select more than one) or click on
the Select All button at the bottom of the window
to select all the photos in the folder. Click on
OK to add the photos to your album.
Organizing Photos
The Organize Photos window allows you
to add more photos, remove, rearrange, or rotate photos.
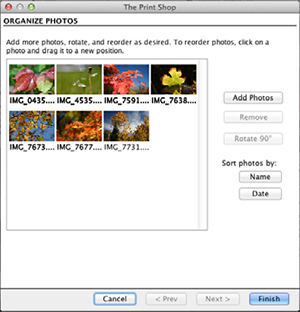
- Click on the Add Photos button to add more
photos.
- To remove a photo from the album, click on the photo thumbnail
in the preview pane and then click on the Remove
button.
- Photos will be placed s in the order that they appear in the
preview pane. To rearrange photos, click on a photo thumbnail, hold
the mouse button down, and drag the photo to a new position. A
green line will show where the photo will be placed.
- If a photo is sideways, click on its thumbnail in the preview
pane and then click the Rotate 90° button. To
select and rotate multiple pictures, hold down the Ctrl key
(Command key on the Mac) as you click on the thumbnails.
- To quickly sort all of the photos by the name of the photo or
chronologically, click on the Name or
Date button.
Click the Finish
button when you have finished adding and organizing photos. The
Print Shop will now add all of the photos to the project. Check
each page carefully after it has completed. Some photos may require
adjusting to display properly. See the Crop topic for more information.
Adding Photos to Partially Covered
Boxes
Now if a photo box is behind a
partially transparent Clipart object the program allows you to
still fill the photo box by dragging and dropping. This is
especially useful for Clipart Frames.
If a photo box is partially covered by
an object and you cannot select it you may still add a photo to
it.
- Open the Photos tab in the Resource Gallery.
- Left-click and hold on an image, drag and drop it onto the
empty photo box, it will ignore the objects on top.
Group-fill photo boxes
- You can now place multiple photo boxes on the canvas, group
them, and then fill the photo boxes with a single image. You can
create very interesting effects, such as lattice window, etc.
- Open the Photos tab under Ribbon Tabs.
- Click on the Add Photo Box icon to place an empty box on your
page.
- Repeat this process, size, and position multiple boxes
throughout the page.
- While holding the shift key, select multiple boxes with a
left-click.
- Once all the boxes are selected right-click on any of the
boxes, from the drop down select Group / Group.
- Open the photos tab in the Resource Gallery.
- Drag and drop an image from the gallery onto the grouped
boxes