The Print Shop 4.0 User Guide
This User Guide is designed to help you learn the software.
Be sure to also check out the
Video Tutorials and the
Blog for
additional ideas. To access the User Guide, either click
on a topic to the left, choose a commonly accessed topic
below, or search for a topic above.
In addition to the information available in The Print Shop 4.0 User Guide, Technical support is also available if you encounter an issue with the software. Solutions to common technical issues can be found using these links, or if necessary report a problem to our Support team.

Shape Paragraph Tools

Changing the
Text Alignment
Text Alignment defines how your text
is displayed on the page.

To change the Alignment of the text in
your shape, start by inserting a shape and then double
clicking on the shape to enter text. Once your shape has text
inserted you can set the Alignment by doing the following:
- Click on the Shape Tab.

- Click on the Alignment Button.

- Use the drop down box to set your preferred Alignment.
The available options are Left, Right, Centered, and justified.
See the example above to help you choose the one that is best
for you.
Changing the Text
Spacing
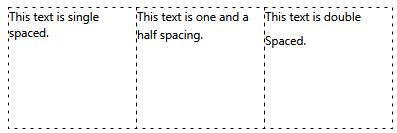
Text Spacing is the distance between
two or more lines of text.

To change the Alignment of the text in
your shape, start by inserting a shape and then double
clicking on the shape to enter text into it. Once your shape has
text inserted you can set the Alignment by doing the following:
- Click on the Shape Tab.

- Click on the Spacing Button.

- Use the drop down box to set your preferred Spacing. The
available options are 1, 1.5, and 2.
Changing a Shape's
Text Margins
To change the Margins of the text in
your shape start by inserting a shape and then double
clicking on the shape to enter text into it. Once your shape has
text inserted you can set the Margins by doing the following:
- Click on the Shape Tab.

- Use the drop down slider tool to set your preferred
Margin.
Back to Working with Shapes
& Lines...
or
Continue to Adding a Line...