The Print Shop 4.0 User Guide
This User Guide is designed to help you learn the software.
Be sure to also check out the
Video Tutorials and the
Blog for
additional ideas. To access the User Guide, either click
on a topic to the left, choose a commonly accessed topic
below, or search for a topic above.
In addition to the information available in The Print Shop 4.0 User Guide, Technical support is also available if you encounter an issue with the software. Solutions to common technical issues can be found using these links, or if necessary report a problem to our Support team.

Creating a Custom Paper Stock

If the paper size you want is not
listed in the available options you can create your own paper
size. Please note though that in order to print using your
own paper stock it must be a paper format that your printer is
capable of printing.
To create your own paper stock, click
on the "New" button from the Blank Project Wizard.

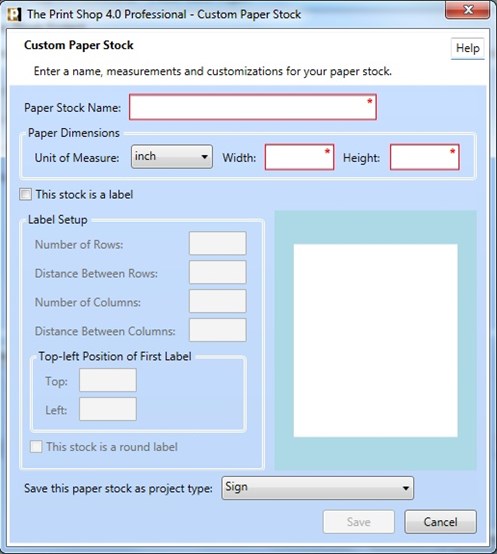
The Custom Paper Stock Wizard is
displayed.

This will give you the following
options:
- Paper Stock Name - names your paper stock for later use.
- Paper Dimensions - sets the length and width of the paper stock
in either inches or millimeters.
- This stock is a label option - allows you to setup the project
as a label or business card and makes the label setup fields
available.
- Number of Rows - sets the number of horizontal rows.
- Distance Between Rows - sets the amount of empty space between
each label vertically.
- Number of Columns - sets the number of vertical columns.
- Distance Between Columns - sets the amount of empty space
between each label horizontally.
- Top - Left Position of First Label - sets the top and left
margins of your paper stock.
- This stock is a round label option - sets your labels to either
round or square.
- Associate Paper stock with drop down - assigns a project
category to this paper type, so it can be easily accessed in the
future.
- Save - saves the custom paper for later.
- Cancel - returns you to the Blank Project Wizard.
A preview of your blank template is
displayed on the right side of the Custom Paper Stock wizard, based
on your current options.
Once you're done setting up your
Custom Paper Stock, click Save. The Blank Project Wizard is displayed,
and your new paper stock will be in the list of available paper
stocks.
Back to Create from Scratch...