
Editing Photos

Click on a photo to open the Photos
section of the Ribbon Tabs:

See the function descriptions below
for more details.
Add Photo
Click on this icon or choose
Insert > Add Photo from the
menu to add a new photo to the current project page. See Adding Photos
for more information.
Matte
Click on this button to add a matte(a
border or frame around a photo) to a photo, or to edit an existing
matte on the currently selected photo.
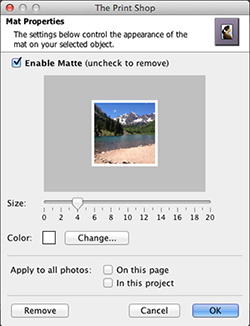
In the Matte Properties dialog:
- Ensure that the Enable Matte box is checked. Clear the check in
the box to remove the matte.
- Drag the Size slider to change the size of the matte(the
numbers represent the width of the matte in pixels).
- Click on the Change button next to the Color
square to choose a color for the matte. See the Choose Color
topic for more information on choosing colors.
- Check the On this page box to add a matte with the same
settings to each of the photos on the current page.
- Check the In this project box to add a matte with the same
settings to all photos on every page in the project.
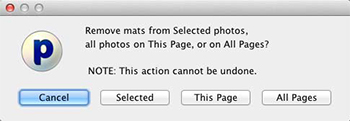
- The Remove button is another method for
removing the matte from the selected photo. This method also allows
you to remove mats from all photos in the project or all photos on
the page. After clicking the Remove button, click
on your choice in the new window that appears.
- Click OK to apply the matte.
Photo Drop Shadow
Click on this button to add a shadow
to a photo, or to edit a photo's existing shadow. A shadow makes
the photo stand out and gives it a sense of depth on the page.
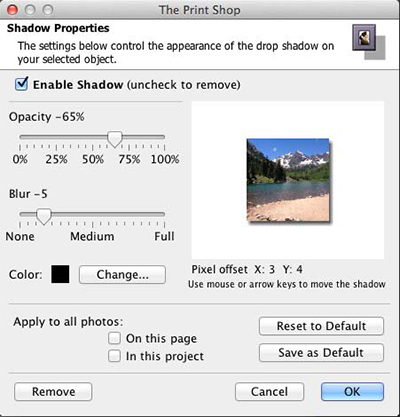
In the Shadow Properties dialog:
- Ensure that the Enable Shadow box is checked. Clear the check
in the box to remove the shadow.
- Use the Opacity slider to affect how dark or light the shadow
is.
- Use the Blur slider to increase or decrease the sharpness of
the shadow's edge.
- Click on the Change button next to the Color
box to choose the shadow's color. See the Choose Color
topic for more information on choosing colors.
- Click on the shadow in the area to the top right and hold the
mouse button while dragging to adjust the shadow's placement. You
may also use the arrow keys on the keyboard to nudge the
shadow.
- Check the On this page box to add a shadow with the same
settings to each of the photos on the current page.
- Check the In this project box to add a shadow with the same
settings to all photos on every page in the project.
- Click on the Reset to Default button to clear
the current settings.
- Click on the Save as Default button to save
the current settings as the default settings for photos in The
Print Shop. To clear default settings, click The Print
Shop menu and choose Preferences, click
on the Shadow tab, check the Photos box, and click
Reset to System Default.
- The Remove button is another method for
removing the shadow. This method allows you to remove shadows from
all photos in the project, all photos on the page, or the selected
photo. After clicking the Remove button, select
your choice in the new window that appears.
- Click OK to place the shadow.
Add Photo Box
Click on this icon to add a new photo
box to the page. The photo box will appear in the center of the
page. You can then drag it to a new location, resize it, or fill
it.
Note: The difference between this and
the Add Photo function is that if you delete a photo from the page
that you added by filling a photo box, the photo box will remain
(allowing you to maintain the layout and fill the box with another
photo). On the other hand, if you delete a photo that was added
using the Add Photo function, no photo box will remain.
Crop
Use this tool to display the desired
part of a photo.
- With a photo selected, click on the Crop icon
from Photos in the Ribbon Tabs. The Crop window opens with the
photo in it.
- If the photo is already cropped, it will show the current crop
area. Skip to step 3. If the photo does not have a currently
defined crop area, the mouse cursor becomes a crosshair. Position
the crosshair, then click and hold the mouse button down while
dragging the mouse to define the crop area, and release the mouse
button.
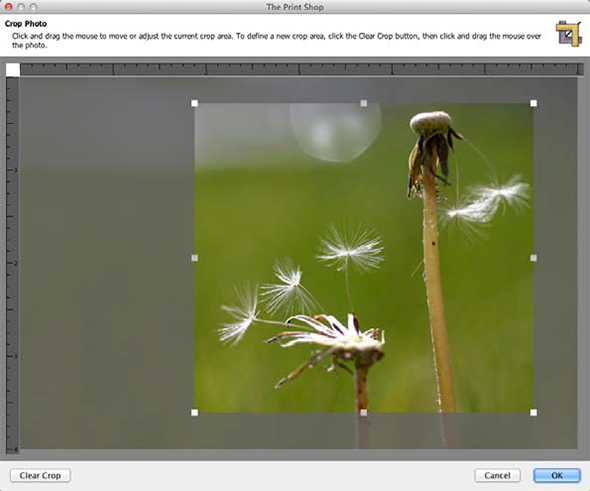
- You can drag the crop area around by clicking on it and holding
down the mouse button as you move the mouse. You can also increase
or decrease the crop area size by clicking on the box with the
arrows at the bottom right corner of the crop region and holding
the mouse button down as you drag the mouse.
- To start over, or to display the entire photo, click on the
Clear Crop button in the bottom left corner of the
window.
- When you are satisfied with your crop area selection, click on
the OK button. The grayed out parts of the photo will not be shown
on the page. Your photo will be the same size as the crop area and
will not resize to fit a photo box (if originally added from a
template).
Nudge Photo
This tool allows you to adjust the
position of the photo within the crop area without reopening the
Crop Photo window. Click on an arrow to nudge the photo in the
direction of the arrow. Clicking on the corners of the icon will
nudge the photo diagonally.
Note: This tool will have no effect if
the photo is not cropped.
Remove Red Eye
Red eye is the undesired effect that
causes the irises of a person's eye to appear red in a photograph.
To reduce this effect:
- With a photo selected, click on the Remove Red
Eye icon under the Photos heading in the Ribbon Tabs.
- The red eye reduction tool will open in a new window.
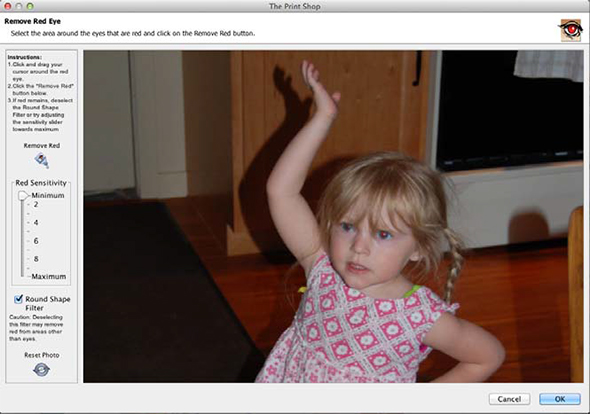
- Click on the area of the photo where the red eye appears, hold
down the mouse button, and drag a rectangle over the affected
area.
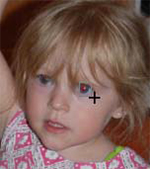
- When you release the mouse button, a light gray rectangle will
indicate the area you have selected. The area does not need to be
exact, as long as you do not include any portion of the photo with
red that you would like to keep (lips, red earrings, red shirt,
etc.).
- The Red Sensitivity slider determines the
reduction tool's interpretation of red. The higher the slider
setting, the broader the interpretation (more shades of red will be
replaced). Start by using low settings (2 or 3) and increase as
needed.
- Checking the Round Shape Filter box will limit
red replacement to circular areas (recommended). Removing the check
will replace all the red in the selection area, regardless of
shape.
- The Reset Photo button returns the photo to
its original state (before any red eye reduction).
- After choosing your settings, click on the Remove
Red button. It may take a few moments for The Print Shop
to process the red eye reduction.
The reduction tool may be used several
times while the window is open. When you are finished, click
OK to apply the changes or Cancel
to exit the window without keeping the changes.
Rotate 90° Left/Rotate 180°/Rotate 90°
Right
This feature makes it easy to correct
photos that were taken in different orientations (portrait and
landscape) so that everything is right side up. The left button
rotates the photo 90° counter-clockwise, the middle button flips it
vertically, and the right button rotates it 90° clockwise.
Rotate (by Degrees)
To rotate a photo, drag the slider to
set the angle of rotation. The number in the box at the top right
will show the angle in degrees. Negative numbers represent
counter-clockwise rotation. You may also type the angle of rotation
in the box by clicking in the box, entering the number, and hitting
Enter/Return on the keyboard.
Opacity
This allows you to make photos
semi-transparent (the original state of the photo is 100% opaque -
not transparent at all). Drag the slider to the left to make a
photo more transparent or drag the slider to the right to make a
photo more opaque (less transparent).
Zoom In/Zoom Out
These buttons allow you to increase or
decrease the amount of the photo that is shown, while maintaining
the photo's size. Click on the plus icon to make a portion of the
photo larger (zoom in). Click on the minus icon to display more of
the photo (zoom out).
Photo Effects
Click on this drop-down menu to select
an effect for the selected photo.
- Black & White - Transforms a color photo
into a black and white photo.
- Sepia - Applies a brown and white coloration
to the photo like early 20th century photographs.
- Blue - Applies blue coloration to the
photo.
- Red - Applies red coloration to the
photo.
- Brighten - Moves the balance of light and dark
shades in the photo more toward the light shades.
- Darken - Moves the balance of light and dark
shades in the photo more toward the dark shades.
- Mirror - Turns the photo around horizontally,
as if you were seeing it in a mirror.
- Flip - Turns the photo upside down.
- Blur - Softens the focus, reducing the
definition of the photo.
- Sharpen - Increases the focus, or definition,
of the photo.
- Negative - Reverses the colors in a photo, as
if viewing a film/photo negative.
- Gamma Correction - Changes the brightness
values of the gray tones without dramatically altering the shadows
and highlights.
- Emboss - Makes the photo look like foil has
been placed over the photo, sculpted to the photo's contours, and
then colorized.
- Sketch - Simulates a pencil drawing of the
photo.
- Impressionist Painting - Gives the photo an
artistic, brushed look.
- Fish Eye - Simulates the photo through a
fisheye lens, a lens that distorts photos to make the middle
portion of the photo appear larger and the outer edges
smaller.
- Effect Amount - Certain effects, such as
Brighten and Darken, also include the option to choose how much of
the effect to apply. Drag the slider to the right to apply more of
the effect or to the left to apply less.
Photo Shape
By default, the Photo Shape is a
square/rectangle. To change the Photo Shape, click on this icon,
click on a shape icon, and click OK.
After selecting a photo shape, if you
would like to modify the shape without affecting the photo, click
on the Crop button (instead of using the gray boxes on the sides
and corners of the photo).
Photo Edit
Clicking on this button will bring up
the Object Settings dialog, which allows you to make exact
adjustments to the size and location of the photo.

Click on the up or down arrows next to
each field, or select a number and type in a new value to change
the settings.
- X - Changes the horizontal position of the selected
object.
- Y - Changes the vertical position of the selected object.
- Width - Changes the width of the selected object.
- Height - Changes the height of the selected object.
- Keep Proportions - When checked, this option automatically
adjusts the height as you change the width, and vice versa, to keep
the photo from becoming distorted. Clear the check to allow
stretching.
Paper Rip
- Select a photo
- Right-click on the photo and choose Rip Photo
Edges.
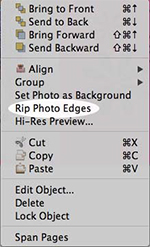
- On the next screen, check the boxes of the sides you would like
to rip, and uncheck the boxes if the sides you wouldn't like to
rip.
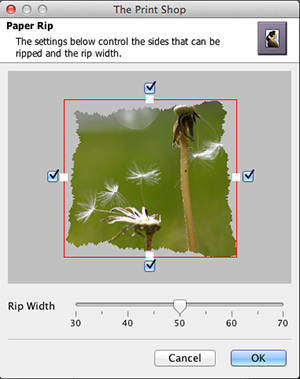
Photo Replace
Click on this button to put a
different photo in the place of a current photo. See Adding Photos
for instructions. The new photo will inherit the size, position,
and photo shape of the current photo.
Photo Remove
Clicking on this button will delete
the selected photo. If the photo was originally a photo box, the
photo box will remain in place of the deleted photo. You can select
the photo box and delete it also.
