
Calendar

Use the Calendar function in The Print
Shop to display a month or year calendar grid on the current
page.
To add a calendar to a page:
- Select a page in the Page Thumbnails.
- Click on Calendar in the Ribbon Tabs.
- There are two main options: a month calendar and a year
calendar. The Add Month Calendar button will add a
calendar grid for a specific month to the page, while the
Add Year Calendar button will add a calendar for
the entire year. See the topics below for more options.
- Click on either the Add Month Calendar or
Add Year Calendar button.
- The calendar grid will appear in the middle of the page. For
editing purposes, a light gray outline will appear around the text.
This outline will not appear in the project's final output (print,
JPEG images, etc.).
- Click on the calendar on the page canvas and drag it to
reposition the calendar. Click on one of the gray handles (small
boxes) around the edges of the calendar box to resize the box.
- To access the standard Object Settings box for exact control
over the size and position of the calendar, right-click on the
calendar and choose Edit Object.
Editing Calendars
To begin editing a calendar, click on
it to select it. The Calendar section of the Ribbon Tabs will open,
displaying the available functions. Refer to the description of
each function below:

Month Calendar Editing Options
- Choose the month to display from the Month drop-down menu.
- Choose the year to display from the Year drop-down menu.
- To display the month, year, and day headings above the calendar
grid, ensure that the Header box is checked. To remove the headings
(to create your own custom headings, for example), clear the check
in the box.
- To display the calendar grid lines, ensure that the Lines box
is checked. To remove the lines, clear the check in the box.
- To display the calendar numbers in the calendar grid, ensure
that the Numbers box is checked. To remove the numbers (to create
your own custom numbers, for example), clear the check in the
box.
- Click on the Edit button to customize a number of display
settings for the calendar header, lines, and numbers: font, font
size, font style, and more. See the Calendar Settings
topic below.
Year Calendar
- Choose the year to display from the Year drop-down menu.
- To display the year and day headings above the calendar grid,
ensure that the Header box is checked. To remove the headings (to
create your own custom headings, for example), clear the check in
the box.
- To display the calendar grid lines, ensure that the Lines box
is checked. To remove the lines, clear the check in the box.
- To display the calendar numbers in the calendar grid, ensure
that the Numbers box is checked. To remove the numbers (to create
your own custom numbers, for example), clear the check in the
box.
- Click on the Edit button to customize a number of display
settings for the calendar header, lines, and numbers: font, font
size, font style, and more. See the Calendar Settings
topic below.
Calendar Settings
The Calendar Settings window allows
you control the appearance of the calendar in great detail. See the
options below:
Header Settings
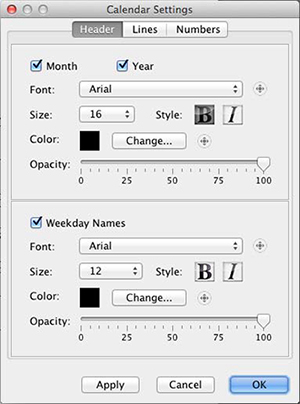
- On the Header tab, the first set of options applies to the
month and year display settings. The second set applies to weekday
names, allowing you to customize the settings for each.
- Check the Month box to display the name of the month in the
calendar header. Clear the checkbox to hide the month name.
- Check the Year box to display the year in the calendar header.
Clear the checkbox to hide the year.
- Check the Weekday Names box to display the names of the
days in the calendar header. Clear the checkbox to hide the weekday
names.
- Change the set of text characters for the names by
choosing a font from the Font drop-down list.
- Change how large the text characters are by choosing a
number from the Size drop-down list.
- Click on B (bold) or
I (italic) next to Size to apply the selected
formatting style to the text.
- Click on the Change button to change the
text color. This opens the Choose Color window.
- Drag the Opacity slider to the left to make the text more
transparent. Drag the slider to the right to make the text more
opaque (less transparent).
- Click OK to apply settings.
Line Settings
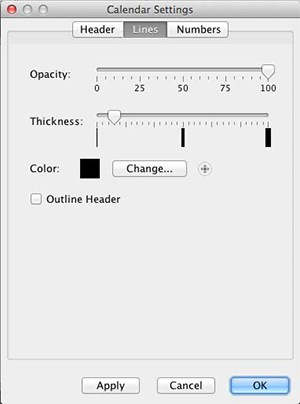
- Drag the Opacity slider to the left to make the calendar grid
lines more transparent. Drag the slider to the right to make the
lines more opaque (less transparent).
- Drag the Thickness slider to the right to make grid lines
heavier and more visible. Drag the slider to the left to make them
thinner. Please note that due to canvas scaling, very thin lines
may not appear correctly on the screen, but will print out
correctly.
- Click on the Change button to change the color
of the calendar grid lines. This opens the Choose Color
window.
- Check the Outline Header box to put a box around the header.
Clear the checkbox to leave the header open.
- Click OK to apply settings.
Numbers Settings
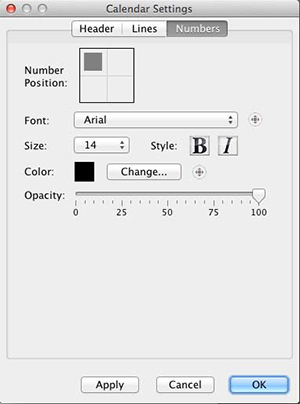
- Click on an area in the Number Position box to choose where to
display the day numbers.
- Change the set of text characters for the day numbers by
choosing a font from the Font drop-down list.
- Change how large the text characters are by choosing a number
from the Size drop-down list.
- Click on B (bold) or
I (italic) next to Size to apply the selected
formatting style to the day numbers.
- Click on the Change button to change the text
color. This opens the Choose Color window.
- Drag the Opacity slider to the left to make the day numbers
more transparent. Drag the slider to the right to make the numbers
more opaque (less transparent).
- Click OK to apply settings.
