The Print Shop 5.0 User Guide
This User Guide is designed to help you learn the software.
Be sure to also check out the
Video Tutorials and the
Blog for
additional ideas. To access the User Guide, either click
on a topic to the left, choose a commonly accessed topic
below, or search for a topic above.
In addition to the information available in The Print Shop 5.0 User Guide, Technical support is also available if you encounter an issue with the software. Solutions to common technical issues can be found using these links, or if necessary report a problem to our Support team.

Spot Touchups

Spot touch ups can be applied in the
photo editor.

Below are samples of what each effect
has on a photo:
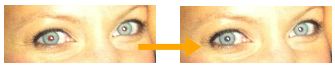
Red-Eye
To Remove Red-eye from a
photo:
- Open your photo in the Image Editor.
- Click on the Touch Up Button.
- Click on the Red-eye Button.
- Use your cursor to draw and move the circle around the red part
of the eye.
- Click the Apply Button.
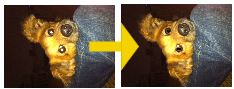
Pet-Eye
To Remove Pet-eye from a
photo:
- Open your photo in the Image Editor.
- Click on the Touch Up Button.
- Click on the Pet-eye Button.
- Use your cursor to draw and move the circle around the glare
part of the eye.
- Click the Apply Button.
Blemish
Remover
To Remove a Blemish from a
photo:
- Open your photo in the Image Editor.
- Click on the Touch Up Button.
- Click on the Blemish Button.
- Use your cursor to draw and move the circle around the
Blemish.
- Click the Apply Button.
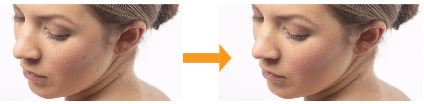
Wrinkle
Remover
To Remove a wrinkle from a
photo:
- Open your photo in the Image Editor.
- Click on the Touch Up Button.
- Click on the Wrinkle Remover Button.
- Use your cursor and click and Drag over the wrinkle.
Note: You can change the Brush Size by clicking on the Brush Size
button and using the slider to increase its size.
- Click the Apply Button.

Teeth
Whitener
To Whiten Teeth in a
photo:
- Open your photo in the Image Editor.
- Click on the Touch Up Button.
- Click on the Teeth Whitener Button.
- Use your cursor and click and Drag over the Teeth.
Note: You can change the Brush Size by clicking on the Brush Size
button and using the slider to increase its size.
- Click the Apply Button.

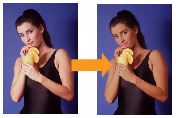
Sunless
Tanner
To apply a Sunless Tan in a
photo:
- Open your photo in the Image Editor.
- Click on the Touch Up Button.
- Click on the Sunless Tanner Button.
- Use your cursor and click and Drag over the the person's
skin.
Note: You can change the Brush Size by clicking on the Brush Size
button and using the slider to increase its size.
- Click the Apply Button.
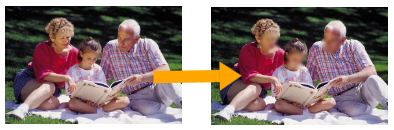
Blur
To apply a Blur to a
Photo:
- Open your photo in the Image Editor.
- Click on the Touch Up Button.
- Click on the Blur Button.
- Use your cursor and click and drag over the part of the photo
you want to blur.
Note: You can change the Brush Size by clicking on the Brush Size
button and using the slider to increase its size.
- Click the Apply Button.
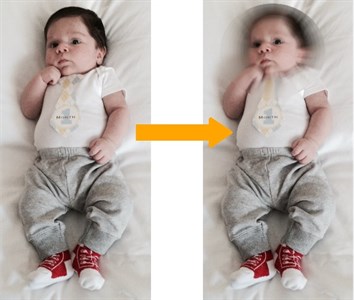
Depth of
Field
To apply a Blur to a Photo:
- Open your photo in the Image Editor.
- Click on the Touch Up Button.
- Click on the Depth of Field Button.
- Use the sliders to customize the intensity and blur
effects.
- The depth of field affect can be applied to a select region by
using the checkbox, use your cursor to add the depth of field
affect to that region.
- Click the Apply Button.
Back to Photo Editing...
