The Print Shop 5.0 User Guide
This User Guide is designed to help you learn the software.
Be sure to also check out the
Video Tutorials and the
Blog for
additional ideas. To access the User Guide, either click
on a topic to the left, choose a commonly accessed topic
below, or search for a topic above.
In addition to the information available in The Print Shop 5.0 User Guide, Technical support is also available if you encounter an issue with the software. Solutions to common technical issues can be found using these links, or if necessary report a problem to our Support team.

Adding a Table

To add a Table:
- Click on the Add Table Object Button
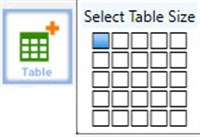
- Use your mouse cursor over the Size selector, they will turn
blue as you mouse over them.
- Each Block symbolizes one cell. Click on it when you have
the number of cells needed.
Note: If you need more cells in either direction don't worry cause
you can add more later.
- Your Table should now be added to your project.
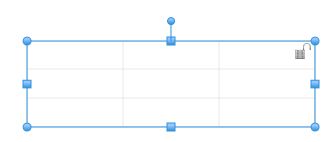
You can now add and format text by
double clicking on a cell and beginning to type. Or you can Fill a cell with an
image. You can also change the grid line Color and
thickness using their dropdowns.
Back to Working with Tables...
or
Continue to Row & Column
Options...
