
Print

After choosing the Print option, the
Print Options window will appear.
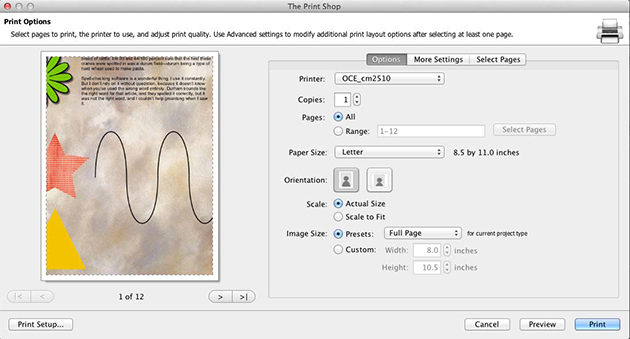
Options
Printer
Choose Printer from drop down
menu.
Paper Size
Choose a paper size from the Paper
Size drop-down menu.
Paper Orientation
These options determine the direction
that the project pages will print on the paper.
Image Size
These options allow you to quickly
choose a specific print size.
- Click on an option in the Standard Sizes drop-down menu to
select a print size.
- Click on the Custom Size option to specify a size that is not
available from the Standard Sizes. Select the number in the Width
or Height field and type in a new value (the ″ character is
required). Alternately, click on the up/down arrows next to the
numbers to change them by small increments.
- The Crop image to fit area option will ensure that the entire
area you specify (e.g. 5"x7") is filled, even if this means
trimming two sides of the page. Refer to the print preview area on
the right side of the screen to see the effect this option will
have on your project pages.
- Click on Span multiple pages as needed to print very large
projects (such as banners) to multiple sheets of paper (typically
standard 8.5x11 paper). After printing, you can attach the sheets
of paper together.
Print Setup
- Select settings specific to your printer such as paper size and
borderless printing.
More Settings (optional)
Click on the More
Settings tab to select layout options for the print job,
such as the number of project pages to print per sheet of paper
(see below). Recommendation: Set your printing margins before
choosing the options in this window.
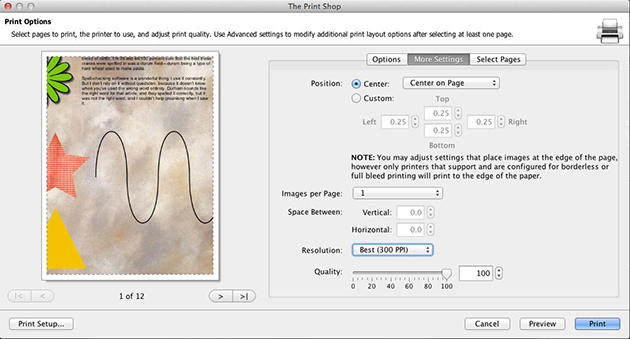
Changes to your print settings can be
previewed in the area to the right as you select them.
Number of Images per Page
This option allows you to print more
than one project page on each piece of paper. In order to print
more than one project page per page, you must first choose a print
size small enough to accommodate multiple project pages from the
Size of Image Area options (e.g. two project pages will fit on a
standard piece of paper at 3"x5").
- Click on the drop-down menu to choose the number of project
pages to print per page.
- Click on the up/down arrows (or type in a number) next to
Vertical space between images and Horizontal space between images
to create a buffer between the project pages that are printing on a
single piece of paper.
- To create a contact sheet, click on the Contact
Sheet button. This will create one or more pages of
thumbnails of the selected project pages. Use the slider to adjust
the size of the thumbnails.
Image Layout Adjustment
- Choose an option from the drop-down list to set the print
placement on the page.
- Select Custom Layout and click on the up/down arrows (or type
in a number) next to the Top/Bottom/Left/Right numbers to manually
set the print area.
Resolution and Quality
- The Print Resolution setting determines how large you can print
your album without a noticeable grainy effect. Choose the Best
setting for large printing sizes (like 12" x 12" or 8 ½" x 11").
Reducing the resolution may speed up print jobs for smaller
sizes.
- Drag the Print Quality slider to choose the quality of the
print job. Choose higher quality settings for final output (higher
settings usually take longer). Use lower quality settings to
quickly print drafts.
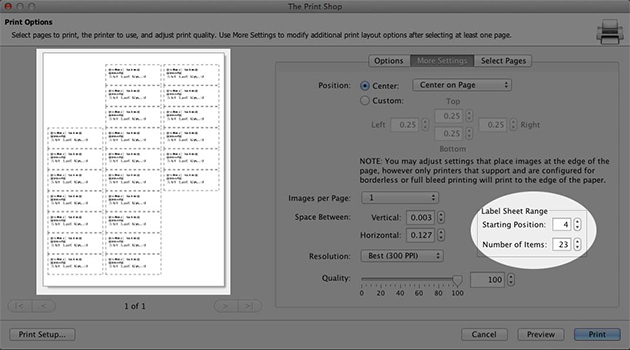
Label Print Offset
You can specify where you want your
labels to print on a label sheet. This can be useful if you have a
label sheet that was printed before but still contains useable
labels.
Label Printing Options
With a label project open go to Print.
On the More Settings tab of the print dialog you
can select which label to start printing at and how many total
labels you intend to print.
Select Pages:
- Check the box in the upper left corner of pages to mark the
page for printing.
- Alternately, type a range of pages in the Page range field. To
indicate a range of pages (e.g. from page 2 through page 5), put a
dash in between the page numbers (2-5). You may also enter specific
page numbers, separated by commas (1,4,6) or a combination of
ranges and individual pages (1-3,5).
- The Select All button will mark all pages for
printing.
- The Clear All button will clear all pages from
printing.
- Click on the buttons with gray arrows at the bottom left to
change the way the page prints. Click the left button to flip the
page vertically. Click the right button to turn the page around
horizontally (mirror).
Preview
- Allows you to preview what your page or pages will look like
printed out. Quick way to double-check settings without wasting
paper actually printing.
Click on the Print
button when you have completed selecting pages, print setup, and
more settings.
