The Print Shop 5.0 User Guide
This User Guide is designed to help you learn the software.
Be sure to also check out the
Video Tutorials and the
Blog for
additional ideas. To access the User Guide, either click
on a topic to the left, choose a commonly accessed topic
below, or search for a topic above.
In addition to the information available in The Print Shop 5.0 User Guide, Technical support is also available if you encounter an issue with the software. Solutions to common technical issues can be found using these links, or if necessary report a problem to our Support team.

Guide Line Tools

For Professional
Version only.
Guide Lines are useful for perfectly
lining up two or more objects.
Do this by using the following Guide
Line Tools:
Adding Drag and Drop
Guide Lines
In order to drag a guide line onto
your project you must first have your Rulers
visible.
Then do the following:
- Click on your Ruler and hold down on the mouse button.
- Move your mouse toward your project and a guide line will
follow your mouse cursor.
- Release the Mouse button when you have your Guide line in
place.
Adding Guides at
Specific Points
In addition to dragging guide lines
onto your project, you can set up the guides to appear at specific
points in your gallery.
To do this do the following:
- Click on the Project Tab.

- Click on the Edit Guide Lines Button.

- The Guide Wizard is displayed.
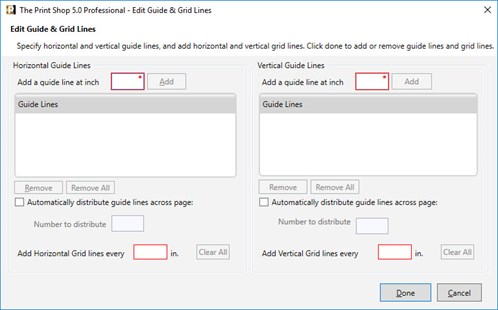
- Enter the value in Inches* of where you want your guide
line.
- Click the Add Button.
- Click the Insert Button.
*Value will be in Centimeters if your
Preferences are set to Millimeters
Distributing Guides
Across the Page
If you want to divide you Project Page
up evenly with Guide lines you can do so inside the Guide
Wizard.
To do this do the following:
- Click on the Project Tab.
- Click on the Insert Guide Button.
- The Guide Wizard will appear.
- Check the box to Automatically distribute guide lines across
page.
- Enter the number of sections you want your page split into in
the Number to Distribute Box.
Using Ready-Made Guides
In The Print Shop there are several
Ready-Made Guide templates.
You can turn on these guide lines by
doing the following:
- Click on the Project Tab.
- Click on the Show Templates Button.

- Click on a template from the Preview bar to insert it into your
project.

Saving Guide
Settings for Later Use
You can set up a template using guide
lines, by saving them into the Ready-Made templates. This will make
it faster and easier to use the same guide lines in future
projects.
To save your guide lines for later use
do the following:
- Create the guides on your page using any of the methods
above.
- Click on the Project Tab.
- Click on the Save button in the guides section.

- A Save Window is displayed.
- Enter a Name for your Template.
- Click Save.
Adjust Snap to Guide
Settings
Snap To Guide is how your objects
react when they get close to a guide line. When Snap to is
enabled the objects will have a slight pull towards the Guide Lines
so that they fit exactly.
You can turn Snap to Guide On or Off
by doing the following:
- Click on the View Tab.

- Uncheck the Box for Snap to Guides.
Clearing and Hiding
Guide Lines
If you no longer want guide lines on
your project you can either Clear them all away or you can hide
them for use later.
To Clear the Guides from your
Page:
- Click on the Project Tab
- Click on the Clear Button

To Hide your Guides:
- Click on the View Tab
- Un-check the Box for Show Guides
Back to Design Desk Tools...
or
Continue to Zoom Tools...
