
Working with Color

Color is used in essentially every
object in The Print Shop.
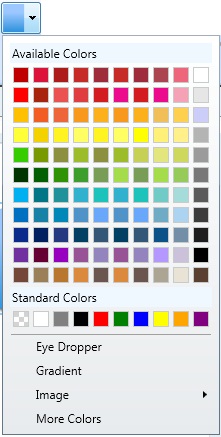
The Color tool is a square box on each
tab filled with a default color. This default color can be
changed at any time by clicking on one of the available colors from
the drop down.
Aside from changing the color using
the color options you have access to the following other tools:
Filling an
object with a Transparent Color
Under the available colors is an
option which appears as a Grey and White Checkerboard. This
option is for a transparent color. Transparent is when there
is no color selected and you will be able to see through the
object.

You would use this in a shape if you
only wanted to see the shapes outline. Or if you wanted to remove a
color from an object you previously filled with a color.
Eye Dropper

This tool will take the color of the
next item you click and match it for your object.
So if you select eye dropper button
and then click on a photo on your project it would match the piece
of the photo you clicked on and fill your object with that
color.
More Colors

This tool will make the Color Picker
appear.
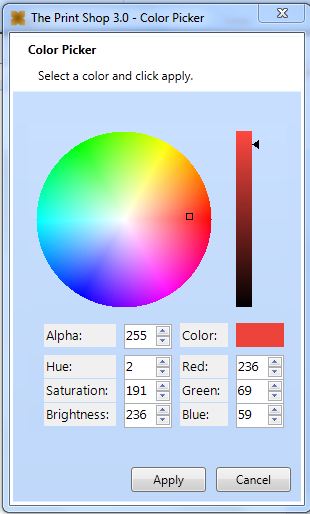
Click anywhere on the color circle to
select a color and then use the up and down arrows next to each
color's name to adjust the color more subtly. To apply the
color click on the Apply Button.
Gradient
Tool
The Gradient tool lets you to set
multiple colors for your fill. To do this:
- Click on the fill drop down.
- Click on the Gradient Option.

- The Gradient tool will Appear.
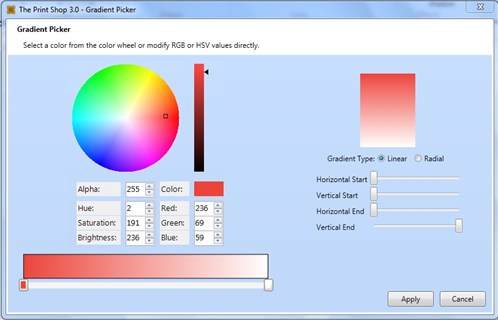
- Along the bottom of the Color wheel will be a small strip of
color with a box on each end.

- Click on the first box to set the first color.
- Click on a color from the color circle above.
- Click on the second box to set the next color.
- Click on a color from the color circle above.
- If you want to add a third or a forth color double click on the
slider bar.
Note: Four Colors is the maximum.
- As you do this you will notice the preview on the right will
change to display what the finished gradient will look like.
- Use the sliders to refine the gradient so that it displays the
way you like.
Note: You can also change the
gradient from Linear to Radial which will give your gradient more
of a circular effect.
Continue to Filling an
object with an Image...
