
Shape Text & Font Tools

Changing the Font of a Shape
To change the Font of text in a Shape,
start by Adding
a shape. Once a Shape is inserted you can
set the Font by doing the following:
- Double Click on the Shape.
- Type in your text.
- On the Shapes Tab click on the Default Font.
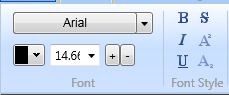
- Use the drop down box to set it to your preferred font.
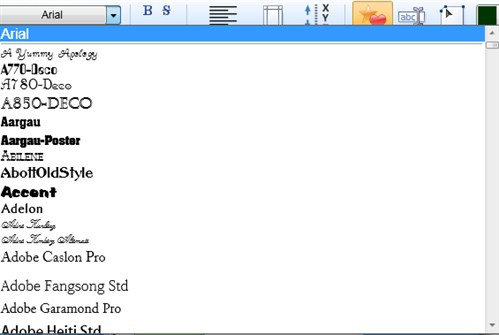
Please Note: The available Fonts
will depend on the fonts that are installed on your computer.
The screenshot above is NOT representative of Fonts that come with
The Print Shop 3.0 For a full list of the fonts included with
The Print Shop 3.0 please click here.
<Include a link to the listing of included fonts>
Changing the Color of Text in a Shape
To change the Color of Text in a
Shape, start by Adding a shape. Once a
Shape is inserted you can set the Color by doing the following:
- Double Click on your Shape.
- Type in your text.
- On the Shapes Tab click on The Default Color.
- Use the drop down box to set your preferred
Color.
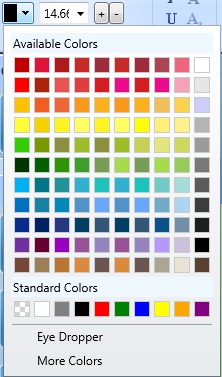
You can also use the Eye Dropper tool to select a color from
anything you click on or the white and grey checkerboard color to
choose a transparent color.
Changing the Size of the Text in a Shape
To change the Size of the Text in a
Shape, start by Adding a shape. Once a
Shape is inserted you can set the Size by doing the following:
- Double Click on your Shape.
- Type in your text.
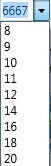
- On the Shapes Tab click on The Default Size.
- Use the drop down box to set your preferred Size.
Using
Text Font Styles
The following text styles can be
applied to your text in The Print Shop 3.0.
- BOLD: Highlights the word to make it stand out
more
- Italics - gives the words a slight tilt.
Normally to emphasize something.
- Underline - Places a line under your text.
- Strikethrough - Places a line Through your text to
show words that have been Deleted. These words will still
Print.
- SuperScript - Makes the word smaller and higher up
on a line.
- SubScript - Makes the word smaller and farther down
on a line.
Return to Working with
Shapes & Lines...
